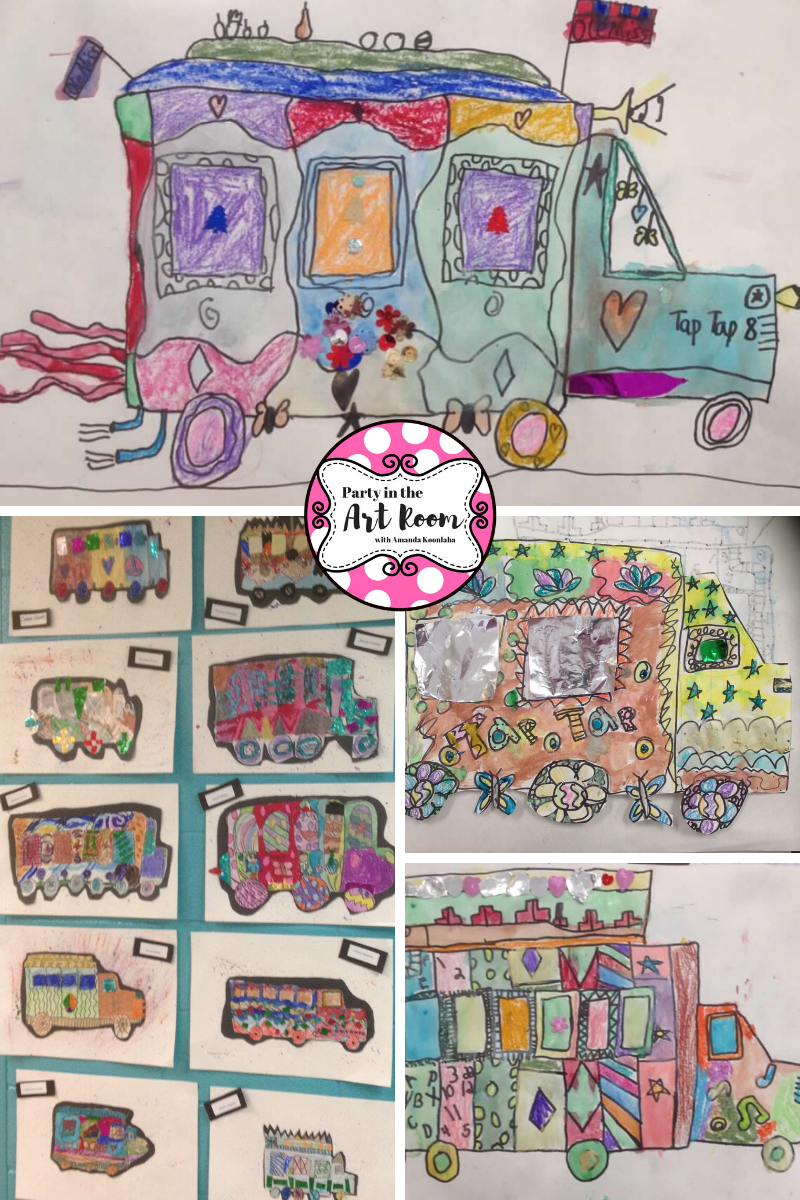
Literature-Based Art Project: Tap-Taps
Combine literature with art and you now have a unique way to teach children using a variety of subjects and concepts. For this fun project, my students were able to learn about tap taps by reading the book called Tap-Tap, by Karen Lynn Williams.
Lessons Learned in the Literature
I have never been to Haiti, so I didn't have firsthand knowledge of these. I relied on books for the information that I taught to students. Third grade students learned about Tap Tap Buses. These are a means of transportation in Haiti. They are much like cabs and taxis, except that they are painted works of art! They may also be referred to as camionette. Privately owned, the name of these literally means "quick quick".
Tap Taps Art Project Explained
Created in the visual arts classroom, students created their own two-dimensional Tap Tap. First, they drew the general shape of a bus and added decorations, focusing on patterns. Then, they used mixed media (oil pastels, crayons, watercolors, paper) to add color. Next, they cut out their bus and attached it to black paper. They cut around the bus on the black paper to create a black border.
For the background, they used tempera cakes to splatter paint by tapping the end of their paint brush. They learned how to be in control of the paint while creating the background by focusing brains, eyes, and hands on the task. Finally, they glued their bus to the background.
Throughout the project, students used appropriate art vocabulary in both large and small group discussions with other students and the teacher.
How to Create Your Own Literature-Based Project
After reading how easy it was for me to take a book and create an art project for my students, you may be wondering how to do the same for yours. It’s as easy as 1, 2, 3!
First, choose a book that is age-appropriate, engaging, and offers some type of learning concept that you can use to teach your students. I’ve also used an Eric Carle book for art project-based learning. If necessary, print extra materials to help teach the concept.
Second, gather all materials and supplies you’ll need to make the craft. It helps to create one to show to give your students an idea of what they will be creating. Use every opportunity for teaching. For example, talk about the use of different supplies… such as brushing and coloring techniques.
Lastly, execute. Put everything together to create a lesson that children will have fun doing and remember. Make a big deal about the artwork they are creating by having them share it in groups, then hang it on the wall (or door).
In conclusion, my students really enjoyed this project. I love how differently they all turn out. The students absolutely got to be creative and make their own decisions about their work with this one! I highly recommend trying this with your students.
Affiliate Disclosure: Party in the Art Room is supported by its audience. When you purchase through links on this site, a commission may be earned.


