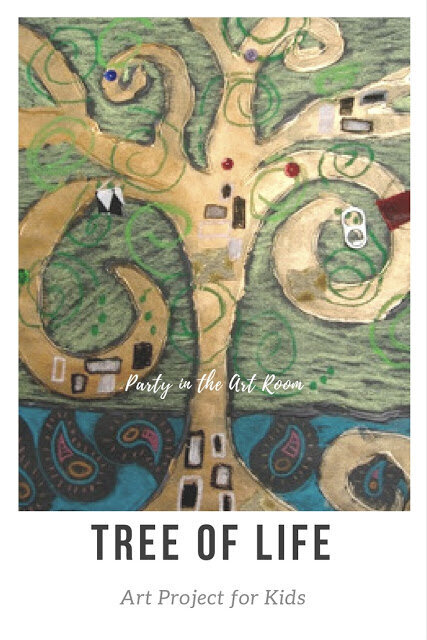
Klimt-Inspired Trees
One of my favorite artists is Gustav Klimt. His artwork really inspires me. I wanted to introduce my students to his work, so I started with a project based on his Tree of Life, c.1909.
Here's what we did:
I began the project by showing the students a sampling of Klimt's work. We talked about his style, and I pointed out similarities in all of the art that we viewed. I am very fortunate to have a Promethean Board to use to show the images.
Students started their work by drawing the tree in pencil on an 11x14 sheet of black construction paper. When they were satisfied with what they had drawn, they traced their pencil lines with Elmer's Glue-All. It is helpful to have the students touch the tip of the bottle cap to the paper as they trace. It helps steady their hand.
I also made sure to encourage the students to use only one hand while they were tracing with the glue. That makes it feel more natural and makes the glue line more even. However, in order for them to be able to use just one hand, I had to make sure the glue bottles stayed full, and that the caps were closed back after each use. Otherwise, it would have been too hard to squeeze the glue out with just one hand. (Check out this post about making sure your glue bottles stay functional and teaching kids to care for them!)
Drawing and tracing the tree took about one-45 minute session.
Next, the students used construction paper crayons to color the sky and ground. They used the patterns poster (see this post) to draw and color the ground.
This took about one-45 minute session.
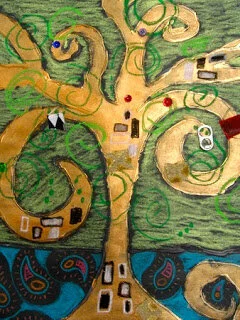
Detail of student work.
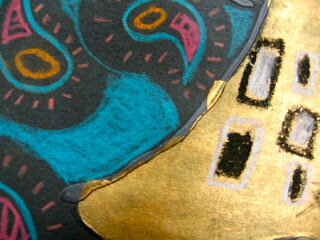
The students painted the tree using copper acrylic paint. I would have preferred to use gold paint because Klimt had a "Golden Period" in which he used the color dominantly in his work. However, gold acrylic paint was not available. So we used copper, and it still turned out great!
I instructed the students to keep the paint off of the dried glue lines. If they got paint on the glue by mistake, I told them to quickly wipe it off with their finger if they could. Sometimes, the paint would dry before they could wipe it off. In those cases, we touched it up with a black permanent marker.
This took another 45 minute session.

Detail of student work showing the types of random knickknacks we used to glue to the trees.
They used black and white oil pastels to draw rectangles and squares on the tree. During this session, I reviewed the students on Klimt's artwork by again showing the works on the Promethean Board. The black and white shapes that Klimt uses are especially prevalent in The Kiss, c.1907-1908, and Adele Bloch-Bauer I, c.1907. They also used oil pastels to draw swirls around the branches. I instructed the students to cross from the sky, over the glue, and onto the copper branches with their lines.

Another detail of student work.
BE VERY CAREFUL when showing Klimt's work to students. Many of his works contain nudity. I advise against Googling him on a smart board in front of the students. (No, I am not giving advice based on my personal experience haha!) It is best to find the images you want to show and create a PowerPoint or Keynote.
Finally, the students added found objects to their tree. I had asked for donations of random knickknacks and got an interesting assortment of things. I had buttons, stickers, scraps of paper, ribbon, fabric, wood, bottle tops, etc. I like the buttons the best for this project. So I did go out and purchase some extra buttons to ensure that each student had enough for their piece.
Adding the final touches took about one-45 minute session.
