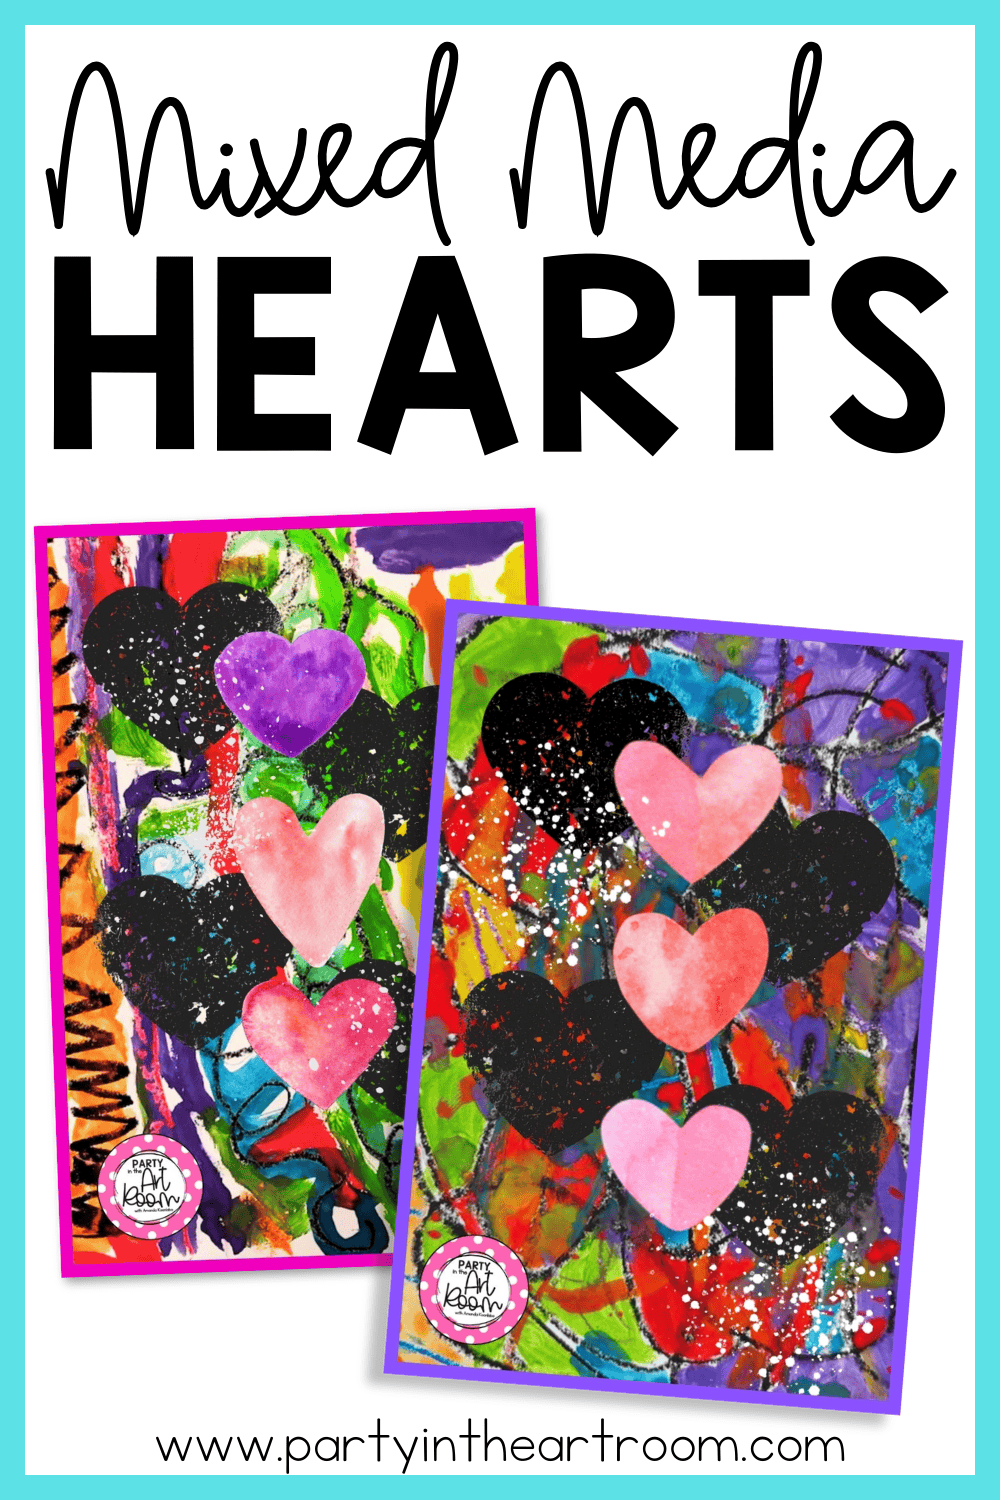
How to Make Sparkle Heart Art for Valentine's Day
Valentine’s Day can be the perfect occasion for students to create art that is full of vibrant colors and love. Sparkle heart art is the perfect Valentine's Day art project because it uses a variety of techniques to create a fun and festive piece of art for Valentine's Day. Students can even make their project as a gift for a loved one. Here is how to make sparkle heart art for Valentine's Day.
Encouraging students to embrace their own artistic vision sparks creativity and makes every project uniquely memorable.
Materials
· Tempera Cakes
· Black Oil Pastel
· Heart Shaped Sponges
· Scissors
· Optional Gold Paint
· Glue
Step 1 – Create the Background
The first step in creating your Valentine's drawing is to create the background. Have students take a piece of white tagboard and expressively paint the board with tempera cakes. Encourage your students to use as many colors as they would like. Students do not have to stick to the traditional Valentine's Day colors of reds and pinks. Their backgrounds should be full of vibrant colors.
Step 2 – Add Texture to Your Background
Once students have their white tagboard painted in vibrant colors and the backgrounds have dried, it is time for them to add texture and depth to their Valentine's painting with a black oil pastel. Instruct student to add patterns and lines to their background. These lines and shapes can be random. It is important for students to use this step to practice drawing lines and shapes with an emphasis on their personal expression.

Experimenting with unexpected color combinations can transform a simple base into an inspiring canvas for creative expression.
Step 3 – Add Your Black Hearts
After students texturize their background with the black oil pastels it is time to add the black hearts. Students will use the large sponge hearts to stamp their hearts directly on their backgrounds. Students can paint their sponge black and stamp it or use an ink pad. Encourage students to add four black hearts on the background of their Valentine's Day art activity.
Step 4 – Paint Your Watercolor Hearts
While the large black hearts and background finish drying, students will use the time to start making colorful hearts to layer onto their Valentine's art. Students will use watercolor paints to paint a white tagboard. Students can use a variety of colors to paint all over the tagboard. Encourage students to use a few different colors on their tagboards to give their Valentine imagery some variety. You can also have each student paint their tagboard a different color and share it with their classmates. This ensures that everyone will have a variety of heart colors while also practicing basic collaboration.
As an alternative to watercolor paints, students can also use gold paint to paint their white tagboard. Gold paint can give your Valentine's Day art project a more elegant look although it won’t be as colorful and vibrant.

Encouraging layered approaches in art allows students to add personal flair and depth to their creative projects.
Step 5 – Cut Out Your Watercolor Hearts
After students have painted their white tagboard with watercolor paints or gold acrylic paint, it is time for them to cut out their hearts. Have students use scissors to cut out three heart shapes from the painted tagboard. If they are sharing painted tag boards with other students have them cut out a heart from each different color. Encourage students to make each of their three heart shapes unique to add more fun to the project.
Step 6 – Add Your Watercolor Hearts to Your Piece
Once students have cut out their painted hearts it is time to add them to their Valentine's Day art. Have students arrange their hearts on the painted background. Encourage students to align the hearts in a straight line near the center of the background. Students can add their own personal touch to their alignment if they so choose. Once students have decided on their heart's alignments they can secure them to the background by using glue.

Embracing experimentation in design can lead to beautifully unexpected details that elevate the final masterpiece.
Step 7 – Finish with Paint Splatters
Once students have attached their cut-out hearts to their finished background, it is time to add the finishing touch to their Valentine's Day drawing. Splattering paint across the top of their project will give your heart a sparkle effect that gives the illusion of shimmering paint. To add the splatters, have students dip their brush in some white paint and gently flick the brush over the painting. Instruct students to keep their brushes about 8 to 10 inches away from their painting to keep the paint splatters small. If the splatter is applied too close, the sparkling effect may not be achieved. Once the paint splatter is dry, this Valentine's Day art is ready to be gifted to a loved one.
You Might Also Be Interested In:


Perfect for anyone who thrives on hands-on, visually engaging activities, the Social Emotional Skills with Vincent Van Gogh pack brings art and emotion together to support holistic growth. Ready to make a meaningful impact on your homeschool journey?

Shop Workbooks on Amazon
Affiliate Disclosure: Party in the Art Room is supported by its audience. When you purchase through links on this site, a commission may be earned.
Get to know Amanda Koonlaba!
Hi! I’m Amanda. Teaching children to be creative thinkers is my greatest joy. I’m here to help you bring that same joy to your classroom.

This guide is packed with 25 ideas for using art to teach math and ELA. It’s arts integration for the win!

I want all students to feel successful in the art room, so I created a standards-based Daffodil Collage lesson to do just that! The lesson includes an artist study, student reflection, and more, so push your artists to their full potential.